
Over Exposure and Under Exposure Adjustments

(Camera Tip: To correct exposure in the camera so that you (hopefully) won't need Photoshop click here!)
Photoshop Exposure Adjustment
In Photoshop: Click on Image on the menu at the top of your screen (see the screen-shot above). In the pop-up menu, click on Adjustments. In the 2nd pop-up menu, click on Exposure.
Over Exposure Adjustment
Within the Exposure pop-up are 3 adjustment sliders: Exposure, Offset and Gamma. Experiment with the sliders.
Offset -.0020 to -.0098 will usually darken the photo enough to create more balanced lighting.If the photo needs more darkening, try adding Gamma at .95 to .85.
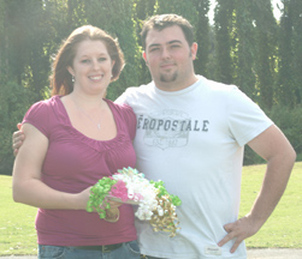
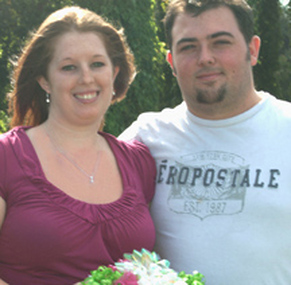
On the photo below I corrected the too light and hazy image (caused by sunlight entering the lens) by using Offset -.0099 and Gamma.60.
Offset -.0020 to -.0098 will usually darken the photo enough to create more balanced lighting.If the photo needs more darkening, try adding Gamma at .95 to .85.
On the photo below I corrected the too light and hazy image (caused by sunlight entering the lens) by using Offset -.0099 and Gamma.60.
|
|
Offset has a tendency to also sharpen the image. In the example above that was a good thing.
Too much gamma, however, will begin to make your photo look manipulated and garish. Add it sparingly, as you would a new seasoning for your favorite dish!
Too much gamma, however, will begin to make your photo look manipulated and garish. Add it sparingly, as you would a new seasoning for your favorite dish!
Under Exposure Adjustment
Within the Exposure pop-up are 3 adjustment sliders: Exposure, Offset and Gamma. Experiment with the sliders.
|
|
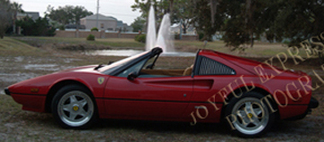
To correct a too dark image, gradually slide the Exposure slider to +.20. Exposure will give skin tones a gentle glow if used sparingly . I rarely go over +.20 and almost never over +.30
If your photo still needs more lighting, try adding Gamma at 1.05 to 1.10.
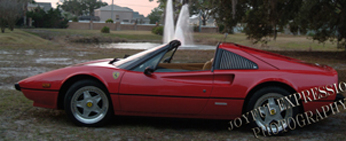
In the red Ferrari above, the ambient (natural - non flash) lighting of the left photo needed only a touch of exposure to show off the car's sporty elegant lines. The subtle exposure correction is shown in the photo on the right.
HOT-TIP! If over-used, positive (+)Exposure will blow out the detail of white or light gowns. Use less Exposure and carefully add a bit more (positive)Gamma if additional brightness is needed.
If your photo still needs more lighting, try adding Gamma at 1.05 to 1.10.
In the red Ferrari above, the ambient (natural - non flash) lighting of the left photo needed only a touch of exposure to show off the car's sporty elegant lines. The subtle exposure correction is shown in the photo on the right.
HOT-TIP! If over-used, positive (+)Exposure will blow out the detail of white or light gowns. Use less Exposure and carefully add a bit more (positive)Gamma if additional brightness is needed.

To frame your corrected under or over exposure click here.
HINT: The Adjustment Layer at the bottom of the Photoshop Layers Palette permits a change to adjustment whenever you need to revise it.
To learn this easy adjustment, click here.
And to see how exposure adjustments can enhance the photograph of flowers click here.
HINT: The Adjustment Layer at the bottom of the Photoshop Layers Palette permits a change to adjustment whenever you need to revise it.
To learn this easy adjustment, click here.
And to see how exposure adjustments can enhance the photograph of flowers click here.